Overview
Having created a Blueprint Library and an application to invoke its functionality, you will need to link the two together so that events generated by CLIP can be processed by the GUI and vice-versa. This article describes how this is achieved for a simple MFC application although the process is largely similar for other application types. Setting up a GUI to use a Blueprint Library consists of four main stages:
- Edit GUI project settings to reference the Blueprint Library
- Create and start an instance of your Process class
- Modify the window to process CLIP messages
- Link call-back functions and interfaces to dialog functions
The following diagram shows a simple Blueprint circuit definition that exchanges events with a GUI through an interface (far left) and a call-back function (far right).
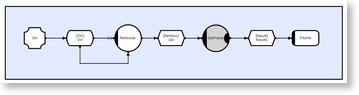
 Click to enlarge
Interfaces and call-back functions both allow the main thread to wait on events from within the CLIP circuitry. The difference between them is that an interface blocks the main thread until the event is available whereas the call-back function consumes the event asynchronously and then notifies the main thread by posting in its message pump. In order for the call-back function mechanism to work, you need to override your window an insert the calls that allow CLIP to intercept its messages.
Referencing a Blueprint Library
In order to use your Blueprint Library you must reference it from the GUI project, which involves the following tasks:
- Add your Blueprint Library to your MFC application's project dependencies (this causes it to link the correct library (.lib) for each configuration).
- Add CLP_PLATFORM_WIN32 to the list of preprocessor directives for each configuration.
- Add ..\<your_blueprint_project> and $(COREDIR)ClipRT to the Additional Include Directories field for each configuration
Where ..\<your_blueprint_project> is the relative path to the folder in which your blueprint project is located.
Creating and Starting your Process Instance
Your Blueprint Library must define an accretion that contains at least one process. When you created your Blueprint Project using the project wizard it was initially populated with an accretion containing a process. The properties defined on this process specify important parameters for initializing the application, including: the way that CLIP allocates memory, handlers for responding to system events and creation of worker threads. For a full description of the available properties see Process Attributes.
To instantiate your circuitry you must create an instance of one of the processes defined in your accretion and call its Startup() member function. In an MFC application this is best done from the OnInitDialog() event handler function after the "TODO: Add extra initialization" generated comment. By default the process is called Process1 and the following code is required to create and start an instance:
Process1Process* proc = new Process1Process();
proc->Startup();
You will also need to insert the following include directives at the top of the file to ensure that the compiler can find your process class:
#include "Process1Process_Includes.hpp"
Modifying the Window to Process CLIP Messages
You now need to add some additional code to intercept messages from the message pump and pass them on to CLIP. The following modifications are required:
- Create an event handler interface class and include it in your project header
- Create an event handler class that implements the event handler interface for your dialog
- Notify CLIP of your event handler class and window handle
- Override your dialog's default window procedure to pass messages to CLIP
Creating an Event Handler Interface Class
The event handler interface class defines the interface through which CLIP communicates with your dialog. It therefore contains a pure virtual function for every event handler that will be provided by the dialog. The following code defines a simple event handler interface:
#ifndef IEVENTHANDLER_HPP
#define IEVENTHANDLER_HPP
// Event handler interface for the dialog
class IEventHandler
{
public:
virtual void OnResults(Results results) = 0;
virtual void OnDiag(char* diag) = 0;
};
// Tell CLIP about the system event handlers we are defining here
#define __EVENT_HANDLER_OnDiagnostic
// Diagnostic handler class
class DiagnosticHandler
{
public:
static void OnDiagnostic(char* diag, void* dlg)
{
IEventHandler* eventHandler = (IEventHandler*)dlg;
eventHandler->OnDiag(diag);
}
};
#endif // IEVENTHANDLER_HPP
This interface defines an OnResults() function to be invoked by the OnResults call-back function that takes a Results data class to be processed by the dialog. In addition, this code also defines a diagnostic handler. The diagnostic handler requires (in addition to the interface function OnDiag), a static class function that enables it to be called by CLIP. This function is passed to CLIP using the OnDiagnostic property within your process:

Creating an Event Handler Class
Having created the event handler interface you need to implement it and provide handlers within your dialog class. The best way to do this is to declare an inner class within your dialog class as this allows you to define the handlers inline while avoiding circular references and the event handler class is not used outside of the dialog class.
// Implementation of the dialog event handler
class CDlgEventHandler : public IEventHandler
{
protected:
CDiagGuiDlg* m_Dlg;
public:
CDlgEventHandler(CDiagGuiDlg* dlg):
m_Dlg(dlg) {}
void OnDiag(char *diag) { m_Dlg->OnDiag(diag); }
void OnResults(Results& results) { m_Dlg->OnResults(results); }
};
In your dialog class you will require an instance of CDlgEventHandler and an event handler function corresponding to each function in the event handler interface:
public:
// Final handler for the diagnostic
void OnDiag(char* diag)
{
// In this case we just output to the debug window
// which could have been done from anywhere but
// because we are executing in the GUI thread now
// this function can access any GUI owned state.
// e.g. by calling drawing functions etc.
OutputDebugStringA(diag);
}
// Final handler for the results
void OnResults(Results& results)
{
// TODO: Add code to render results to the dialog
}
private:
// Pointer to the event handler
CDlgEventHandler* m_EventHandler;
Notifying CLIP of Your Event Handler and Window Handle
Having defined your event handler class you must instantiate it and pass it to CLIP along with your dialog's window handle to enable CLIP to communicate back to the window via this interface. This requires the following code to be inserted just before the code to instantiate and start your process:
m_EventHandler = new CDlgEventHandler(this);
::CLIP::SetCallbackWindow( this->GetSafeHwnd(), m_EventHandler );
You also need to include the header file containing your event handler interface in your dialog header file. The SetCallbackWindow() function is provided by CLIP's Win32 process and therefore you need to include the appropriate header in your dialog header file in order to access it
#include "IEventHandler.hpp"
#include "Gui/Win32/CPP/Include/Win32_Process.hpp"
Overriding The Default Window Procedure
The CDialog class provides a virtual function DefWindowProc() that handles all messages sent to the window. This needs to be overridden to allow CLIP to handle any messages that are intended for your Blueprint application. To do this you must add the following code to your dialog class:
protected:
// Intercept the message pump to process any CLIP events
virtual LRESULT DefWindowProc(UINT Msg, WPARAM wParam, LPARAM lParam)
{
::CLIP::ProcessPumpMessage( Msg, wParam, lParam );
return CDialog::DefWindowProc(Msg, wParam, lParam);
}
Link Call-back functions and Interfaces to Dialog Functions
Call-back functions
When a call-back function is triggered, its Execute() function will be invoked with a pointer to your event handler interface. By default this is passed through as a void* but you can change this to your interface type (e.g. IEventHandler) by editing the properties of the call-back function within the circuit editor.
Within the Execute() function you must supply the necessary code to extract the required data from the provided event (using Access Functions) and call the appropriate handler function defined by your event handler interface.
Interfaces
Interfaces work differently. You can get a reference to your interface using the following code:
CtrlIfce& ctrlIfce = GetCtrlIfce();
Having retrieved the interface you can use it just like a manual connection within a method:
ctrlIfce->OpenWrite();
ctrlIfce->Record().Construct();
ctrlIfce->Record().Data().Initialize( ... );
ctrlIfce->Close();
This will cause the main thread of execution to block on the Ctrl store until a write buffer is available then construct and write a new record and then close the connection. This enables the GUI to inject data into CLIP circuits easily.
Exiting
To exit from a GUI application is simply a case of trapping the Users exit command from the Dialog (Messages WM_CLOSE) and routing this to the CLIP process. When the CLIP runtime has terminated all of the CLIP threads and Slaves (and informed any higher Masters), CLIP will return the exit command to the GUI to enable the application to terminate.
Dialog Header File - e.g. MyDlg1Dlg.hpp
class CMyDlg1Dlg : public CDialog
{
...
afx_msg void OnClose();
}
Dialog Source File - e.g. MyDlg1Dlg.cpp
BEGIN_MESSAGE_MAP(CMyDlg1Dlg, CDialog)
...
ON_WM_CLOSE()
END_MESSAGE_MAP()
void CMyDlg1Dlg::OnClose()
{
ClpExit( "User Exit" );
CDialog::OnClose();
}